
External Wall Insulation (EWI) is a comprehensive solution for enhancing the energy efficiency of a property. However the installation process often requires additional work to accommodate the new insulation layer. This article provides a detailed overview of the potential enabling and supplementary works that may be necessary during an EWI installation.
Before we delve into the specifics, it’s important to understand that the scope of additional work can vary greatly depending on the property’s existing conditions and the specific requirements of the EWI system. Some of these tasks may be included in the initial quote for the EWI installation but others might incur additional costs. Therefore it’s crucial to clarify these details with your EWI installer before work begins
Essential EWI Associated Works
Before embarking on the installation of external wall insulation (EWI), there are several essential associated enabling works that should be considered. These enabling works play a crucial role in ensuring the successful and efficient implementation of the EWI system. They encompass various tasks such as damp treatment, surface repairs, plumbing works, electrical works, removal of architectural features and addressing other specific requirements. By addressing these associated works, property owners can create a suitable substrate for the installation of EWI and maximise the performance and longevity of the insulation system. Let’s explore these essential enabling works in detail.
Extend gas boiler flue
The extension of the gas boiler flue is a critical part of the EWI installation process. The flue which is responsible for expelling the products of combustion (POCs) produced by the boiler, typically protrudes from the external wall of the property.
When EWI is added to the building the thickness of the walls increases, which can cause the flue to become recessed. This is not only against safety regulations but can also lead to the inefficient operation of the boiler. Therefore, it’s necessary to extend the flue so that it continues to protrude from the wall as required
This task should be carried out by a Gas Safe registered engineer to ensure it is done safely and correctly.
Removal of Cast Iron waste and pipes and replace with UPVC
The removal of cast iron waste and pipes and their replacement with UPVC is another important aspect of the EWI installation process. Cast iron pipes, often found in older properties can be heavy, prone to rust and difficult to work with. When installing EWI, these pipes may need to be extended or adjusted, which can be a challenging task due to their weight and rigidity. In addition finding replacement fittings to extend the pipe can be difficult and a specialist job.
Replacing these cast iron pipes with UPVC can offer several benefits. UPVC pipes are lighter, easier to install and resistant to corrosion. They can also be easily cut to size and adjusted as needed to accommodate the new thickness of the external walls after the EWI installation.
There are however scenarios such as historic or listed buildings that will require the installation of replacement cast iron waste pipes, keeping in line with the features of the existing building. For such scenarios there are modern replacement pipes and fittings available from specialist manufactures that will accommodate this requirement
Remove existing alarms and refix, including rewire
The installation of EWI often requires the temporary removal and subsequent refitting of existing alarm systems. This is because the alarms, which are typically fixed to the external walls of the property, can become recessed or improperly positioned due to the added thickness of the insulation. In addition, not having insulation applied to the back of the alarm can cause thermal bridging issues
The process involves carefully removing the alarms and disconnecting the wiring. Once the EWI has been installed, the alarms are then refitted to the new surface of the wall. Typically modern alarm boxes are relatively light and can be prefixed with specialist plugs and fixings into the insulation layer. For older and heavier alarm boxes adequate support needs to be fitted to the wall prior to fitting the insulation in order to provide a good filing point. This is generally in the form of a pattress or block of wood with similar thickness to the insulation.
The process of refixing alarm boxes sometimes requires rewiring to ensure the alarms are correctly connected and fully operational. It’s crucial that this task is carried out by qualified alarm specialists to ensure the safety and functionality of the alarm systems.
Remove existing light fittings and refix, including rewire
The process of installing EWI also involves the temporary removal and subsequent refitting of existing external light fittings. This is necessary because the added thickness of the insulation can cause the light fittings to become recessed or improperly positioned.
The process begins with the careful removal of the light fittings and the disconnection of the wiring. Once the EWI has been installed, the light fittings are then refitted to the new surface of the wall. This often requires rewiring to ensure the lights are correctly connected and fully operational.
This task should be carried out by a qualified electrician to ensure the safety and functionality of the light fittings. It’s also important to note that the removal and refitting of light fittings should be planned in advance as part of the EWI project. This will help to ensure that the property remains well lit and safe throughout the installation process and that the lights are correctly positioned and functioning properly once the EWI has been installed.
Renew fascia & soffits & gutters complete with rain water piping
The installation of EWI provides an excellent opportunity to renew the fascia, soffits, gutters, and rainwater piping of a property. These elements play crucial roles in protecting the property from water damage and maintaining its aesthetic appeal, but they can often be overlooked during regular maintenance.
The fascia and soffits, which form the outer edge of the roof and the underside of the roof overhang respectively, can become worn or damaged over time. Replacing these with new, durable materials can enhance the property’s appearance and improve its resistance to weather damage
Similarly, the gutters and rainwater piping, which collect and channel rainwater away from the property, can become blocked or damaged over time. Renewing these components can ensure efficient water drainage and prevent issues such as water damage and dampness.
Remove and reinstate BT overhead cables
The installation of EWI may necessitate the temporary removal and subsequent reinstatement of BT overhead cables. These cables which provide telephone and broadband services, are typically attached to the external walls of the property. The added thickness of the insulation can cause these cables to become improperly positioned or tensioned
The process involves carefully removing the cables and disconnecting them from the property. It’s important to note that this task should be carried out by a BT Openreach engineer or another qualified professional to ensure the safety and integrity of the services.
Once the EWI has been installed, the cables are then reinstated. This involves reattaching the cables to the new surface of the wall and adjusting the tension as necessary to ensure they are correctly positioned and secure.
The removal and reinstatement of BT overhead cables should be planned in advance as part of the EWI project. This will help to ensure that the property remains connected to telephone and broadband services throughout the installation process and that the cables are correctly positioned and functioning properly once the EWI has been installed.
Surface Telephone cables remove reinstate
Surface telephone cables similar to BT overhead cables may need to be temporarily removed and subsequently reinstated during the installation of EWI. These cables which are typically attached to the external walls of the property, can become improperly positioned due to the added thickness of the insulation
The process begins with the careful removal of the cables, ensuring that the telephone connection is not disrupted. This task should be carried out by a qualified professional to ensure the safety and integrity of the telephone services.
Once the EWI has been installed, the cables are then reinstated. This involves reattaching the cables to the new surface of the wall and ensuring they are correctly positioned and secure. The reinstatement of the cables should be done in a way that maintains the aesthetic appeal of the property while ensuring the functionality of the telephone services.
Remove temporary fix and permanently fix satellite dishes including wiring
The installation of EWI often requires the temporary removal and subsequent permanent reinstallation of satellite dishes and their associated wiring. Satellite dishes, which are typically mounted on the external walls of a property, can become improperly positioned due to the added thickness of the insulation
The process begins with the careful removal of the satellite dish. This task should be carried out by a qualified professional to ensure the connection is not lost. Presence of scaffolding can often interfere with the satellite signal, therefore an option is to temporarily fix the satellite to the scaffolding until the EWI installation is finished but often professionals can adjust the position or the signal to avoid this.
Satellite dishes are too heavy to be fixed directly to the insulation and should either be fixed back on with specialist extending arms that protrude through the insulation or fixed onto a surface block of wood or pattress, similar thickness to the EWI.
Adjust soil vent pipe (UPVC)
The installation of EWI may require the adjustment of UPVC soil vent pipes. These pipes, which carry waste from toilets and other plumbing fixtures to the drains, are typically attached to the external walls of the property. The added thickness of the insulation can cause these pipes to become improperly positioned
The process involves carefully adjusting the position of the soil vent pipe to accommodate the new thickness of the wall. This may involve extending or repositioning the pipe as necessary. It’s important to note that this task should be carried out by a qualified professional to ensure the safety and integrity of the property’s plumbing system
Once the EWI has been installed, the soil vent pipe should be securely attached to the new surface of the wall and properly sealed to prevent leaks or drafts.
Adjust to drainage and gullies
The installation of EWI can also necessitate adjustments to the property’s drainage system and gullies. These elements, which are designed to collect and channel rainwater away from the property can be affected by the added thickness of the insulation
The process involves carefully adjusting the position and alignment of the drainage system and gullies to accommodate the new thickness of the wall. This may involve repositioning or extending the drainage pipes and gullies as necessary. It’s important to note that this task should be carried out by a qualified professional to ensure the safety and integrity of the property’s drainage system
Once the EWI has been installed, the drainage system and gullies should be securely attached to the new surface of the wall and properly sealed to prevent leaks or water damage.
Extend window sills
The installation of EWI often requires the extension of window sills. Window sills, which protrude from the wall beneath the windows serve both aesthetic and functional purposes. They help to direct rainwater away from the windows and walls, and they also add architectural interest to the property. However the added thickness of the insulation can cause the window sills to become recessed
The process involves carefully extending the window sills to accommodate the new thickness of the wall. This can be achieved by adding a sill extension, which is a piece of material that matches the existing sill and is designed to provide adequate length by being fitted on the existing sill. It’s important to note that this task should be carried out by a qualified professional to ensure the safety and integrity of the property’s windows.
Once the EWI has been installed, the extended window sills should be securely attached and sealed to the new surface of the wall and properly sealed to prevent leaks or drafts.
Extend overflows/condensing pipes
The installation of EWI may require the extension of overflow and condensing pipes. These pipes, which are typically attached to the external walls of the property, can become improperly positioned due to the added thickness of the insulation

Overflow pipes are designed to carry excess water away from appliances such as toilets and tanks while condensing pipes carry condensate, a by product of the combustion process in condensing boilers away from the boiler to a drain or soakaway.
The process involves carefully extending the overflow and condensing pipes to accommodate the new thickness of the wall. This may involve adding pipe extensions or repositioning the pipes as necessary. It’s important to note that this task should be carried out by a qualified professional to ensure the safety and integrity of the property’s plumbing and heating systems.
Once the EWI has been installed, the extended pipes should be securely attached to the new surface of the wall and properly sealed to prevent leaks or drafts.
Extend external tap
External taps which provide an outdoor water source can become improperly positioned due to the added thickness of the insulation.
The extending process involves carefully extending the external tap to accommodate the new thickness of the wall. This may involve adding a tap extension or repositioning the tap as necessary.
Remove redundant services
During the installation of EWI, it may be necessary to remove redundant services from the property. Redundant services can include old or unused pipes, cables, alarm boxes, unused satellites and other fixtures that are attached to the external walls of the property. These can interfere with the installation of the external wall insulation and can cause issues with the finished appearance of the EWI.
Alterations around gas/electric meter boxes
Gas and electric boxes are often located on an outside wall of a property and are usually attached to the wall with services entering the meters from below. Ideally they need to be relocated or moved forward to accommodate insulation to be placed behind them, but as this is specialist and can only be carried out by service providers such as UK Power Networks and Cadent. This can be very time consuming and costly practice, so a more common and acceptable approach is the use of Aerogel insulation behind existing meters.
When installing EWI, it may be necessary to use a special type of insulation, such as aerogel, behind meter boxes. Meter boxes, which house gas and electric meters, are typically attached to the external walls of the property and can create a thermal bridge, an area where heat can escape more readily, undermining the effectiveness of the insulation.
Aerogel is a highly effective insulating material that has a very low thermal conductivity, making it ideal for use in areas where traditional insulation materials may not be suitable. It is often used in situations where space is limited, as it provides a high level of insulation with a minimal thickness.
The process involves carefully fitting the aerogel behind the meter boxes before the EWI is installed. This can help to ensure that the meter boxes do not create a thermal bridge and that the overall effectiveness of the EWI is not compromised.
Once the aerogel has been fitted and the EWI has been installed, the meter boxes should be securely attached to the new surface of the wall and properly sealed to prevent leaks or drafts.
Aerogel insulation boards have much better thermal rating than others such as EPS and Mineral wool and a much thinner board (usually 20mm) can help minimise thermal bridging.

Cut back and remove trees/bushes/vegetation on substrate
Before the installation of EWI, it may be necessary to cut back and remove any trees, bushes, or vegetation that are growing on or near the substrate (the surface to which the insulation will be applied). These can interfere with the installation process and can cause issues with the performance and appearance of the EWI

The process involves carefully cutting back and removing any vegetation that is in the way. In addition to removing vegetation, it may also be necessary to treat the substrate for algae. Algae can cause issues with the adhesion of the insulation to the substrate and can affect the performance of the EWI. The substrate should be treated with an appropriate algae treatment product to kill any existing algae and prevent future growth.
Once the vegetation has been removed and the substrate has been treated for algae, the EWI can be installed on a clean and unobstructed surface. This will help to ensure that the insulation is evenly applied and that the finished appearance of the EWI is smooth and uniform.
Remove and refit wall mounted guards
The installation of EWI may necessitate the removal and refitting of wall-mounted guards. These guards, which can include things like handrails, security lights, or other fixtures, are typically attached to the external walls of the property and can interfere with the installation of the insulation.

The process involves carefully removing the guards before the EWI is installed. This task should be carried out by a qualified professional to ensure the safety and integrity of the property and its fixtures.
Remove and refit signs
The installation of EWI may require the removal and refitting of signs. These signs, which can include house numbers, nameplates, or other informational or decorative signs, are typically attached to the external walls of the property and can interfere with the installation of the insulation
The process involves carefully removing the signs before the EWI is installed. Once the EWI has been installed, the signs can be refitted to the new surface of the wall. This may involve adjusting the position of the signs to accommodate the new thickness of the wall, or it may involve installing new fixtures that are designed to work with the EWI.
Renew airbricks to suit new insulation
The installation of EWI may require the renewal of airbricks. Airbricks, which are special bricks with holes in them, are used in construction to allow air to circulate and prevent the buildup of moisture within the walls. They are typically installed in the external walls of the property and can interfere with the installation of the insulation
The process involves carefully removing the existing airbricks and replacing them with new ones that are suitable for use with EWI (typically extended air bricks). This task should be carried out by a qualified professional to ensure the safety and integrity of the property and its ventilation system.
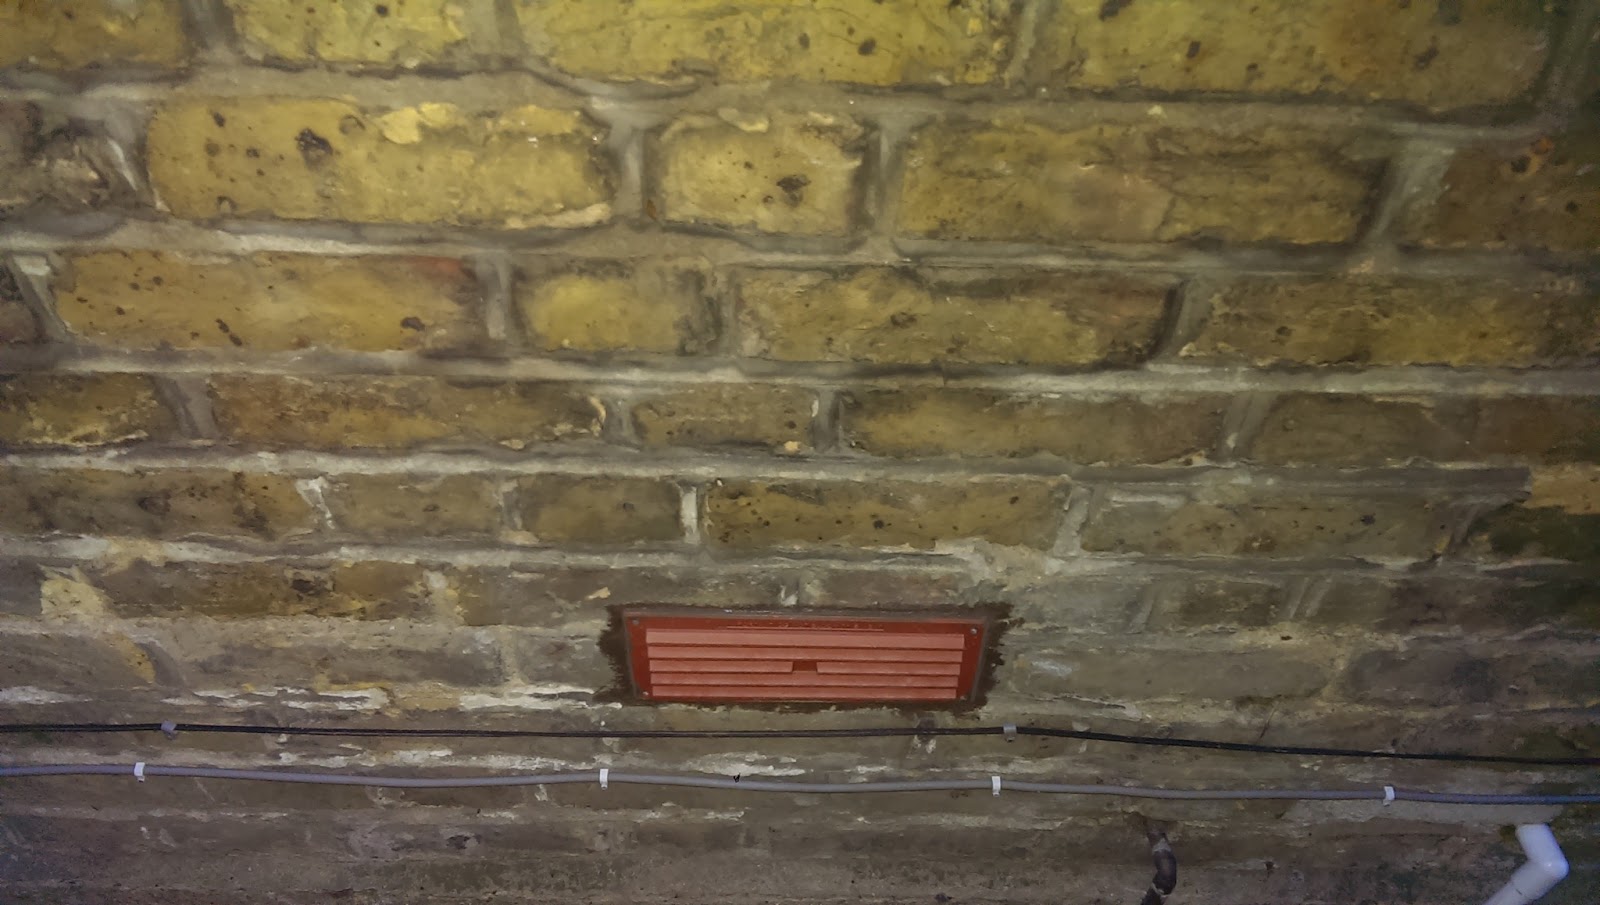
The new airbricks should be designed to work with the EWI and should be installed in a way that allows them to function effectively without compromising the performance of the insulation. This may involve installing the airbricks in a slightly different position or using special airbricks that are designed to work with insulated walls.
Extending Vent outlets and under floor vents
The installation of EWI may require the extension of vent outlets and underfloor vents. These vents, which allow air to circulate beneath the property and through the walls, are crucial for preventing the buildup of moisture and maintaining the structural integrity of the building. However, the added thickness of the insulation can obstruct these vents, potentially leading to issues with damp and condensation
The process involves carefully extending the vent outlets and underfloor vents to accommodate the new thickness of the wall. This may involve installing vent extensions or repositioning the vents as necessary. Once the EWI has been installed, the extended vents should be securely attached to the new surface of the wall and properly sealed to prevent leaks or drafts. The vents should also be checked to ensure that they are functioning correctly and allowing air to circulate as intended.
Remove and reinstate hanging baskets, signs etc
The installation of EWI may need the removal and reinstatement of hanging baskets, signs, and other decorative or functional items attached to the external walls of the property. These items can interfere with the installation of the insulation and may need to be temporarily removed to allow for a smooth and uniform application of the EWI.
The process involves carefully removing these items before the EWI is installed.
Once the EWI has been installed, these items can be reinstated to the new surface of the wall, however as these fixtures can typically be quite heavy they may need to be placed on a block of wood or pattress.
Adjusting attached gates and fence panels to suit External wall insulation
The installation of EWI may require adjustments to be made to attached gates and fence panels to accommodate the new thickness of the walls. These adjustments are necessary to ensure that the gates and fence panels continue to function properly and align correctly with the newly insulated walls.
The process involves carefully assessing the positioning of the gates and fence panels in relation to the EWI. If the insulation adds thickness to the walls, the gates and fence panels may need to be adjusted or repositioned to align with the new surface.
Depending on the specific situation, adjustments may involve:
- Realigning the gate hinges or fence post positions to compensate for the increased wall thickness.
- Adjusting the gate latches or locks to ensure they engage properly with the new wall surface.
- Modifying or extending fence panels to maintain a consistent height and appearance.
- Ensuring proper clearance between gates, fence panels, and the EWI to allow for smooth operation.
It’s important to engage the services of a qualified professional to perform these adjustments to ensure the structural integrity of the gates and fence panels. They will have the expertise to assess and carry out the necessary modifications safely and effectively.
By making the required adjustments, the gates and fence panels can be seamlessly integrated with the EWI, maintaining both functionality and aesthetics.
External gas pipe alterations to accommodate EWI
When installing EWI, it may be necessary to make alterations to the external gas pipes to ensure they align properly with the new insulation. These alterations are crucial for maintaining the functionality and safety of the gas supply while ensuring a seamless integration with the EWI
The process involves carefully assessing the positioning of the gas pipes in relation to the EWI. If the insulation adds thickness to the walls, the gas pipes may need to be adjusted or modified to accommodate the new surface.
Depending on the specific situation, external gas pipe alterations may include:
- Rerouting or extending the gas pipes to align with the new position of the gas meter or appliances.
- Adjusting the height or positioning of gas pipe brackets or clips to ensure they are securely attached to the new wall surface.
- Modifying or replacing sections of the gas pipe to achieve proper alignment and fit with the new insulation.
- Ensuring compliance with gas safety regulations and standards during the alteration process.
It is essential to engage the services of a qualified and Gas Safe Registered engineer to perform these alterations. They have the expertise and knowledge to assess the gas system, plan the necessary modifications, and carry them out safely and in compliance with relevant regulations.
Repair defective render for external wall insulation
Repairing defective render is an essential step in the external wall insulation (EWI) process. The render serves as the protective outer layer of the walls and plays a crucial role in the performance and longevity of the insulation system.
When conducting EWI, any existing defective render must be identified and repaired to ensure a smooth and durable surface for the insulation material. Defective render can include cracks, chips, flaking, or areas of deterioration
The process of repairing defective render for EWI typically involves the following steps:
- Inspection: A thorough inspection of the existing render is carried out to identify areas of damage or defects. This may include assessing the severity of cracks, determining the cause of render failure, and evaluating the overall condition of the surface.
- Preparation: Before repairing the defective render, proper preparation is crucial. This may involve cleaning the surface to remove dirt, debris, or loose render particles. In some cases, it may be necessary to remove the entire damaged section of the render.
- Repair: The repair process begins by addressing the identified defects. Small cracks or chips can be filled with suitable repair materials, such as an appropriate render patching compound. For larger areas of damage, a complete render system may need to be applied.
- Application: The repair materials or render system are applied according to the manufacturer’s instructions. This typically involves applying multiple layers, allowing each layer to dry and cure before applying the next. Proper adhesion and a smooth finish are essential to ensure the longevity of the repaired render.
- Finishing: Once the repaired render has fully cured, any necessary finishing touches can be applied. This may include sanding, smoothing, or painting to match the surrounding area and achieve a seamless integration with the EWI system.
It is essential to engage the services of experienced professionals or qualified contractors to carry out the repair of defective render before EWI installation. They have the expertise to assess the render condition, select suitable repair material, and perform the repairs in a manner that ensures long lasting results
By repairing defective render before applying EWI, you ensure a strong and stable surface for the insulation system. This promotes the effectiveness of the EWI, improves the overall aesthetics of the property, and extends the lifespan of the render system.
Extend Roof verges
Extending roof verges is an important aspect to consider when implementing external wall insulation (EWI) on various types of roofs, including hipped gable roofs, flat roofs, and roofs with different finishes such as tiles, slates, or felt. It is also essential to take into account roof ventilation requirements during the extension process
Before extending the roof verges, a thorough assessment of the existing roof structure is conducted. This assessment considers the type of roof, such as hipped gable or flat, and the specific roof finish, including tiles, slates, or felt. Each roof type and finish may have unique requirements for extending the roof verges
The design and planning phase involves determining the desired length of the extension and selecting suitable materials that are compatible with the existing roof structure. The chosen materials should provide a seamless integration between the extended roof verge and the EWI system
During the installation, additional timber battens or supports may be added to create a stable framework for attaching the new fascia boards. The extension is carefully aligned and securely fixed to the roof structure, ensuring a strong and durable connection.
Proper weatherproofing is crucial to protect the EWI system and the roof structure. Flashing or sealants are applied at the junction between the existing roof and the extended verge to prevent water ingress and maintain the integrity of the EWI system
Consideration for roof ventilation is essential during the roof verge extension. Adequate ventilation helps prevent moisture buildup and ensures proper airflow within the roof space. Ventilation requirements may vary depending on the roof type and local building codes.
Finishing touches, such as painting or treating the fascia boards, are applied to match the existing roof verge and enhance the overall aesthetics of the property. This creates a cohesive appearance between the extended roof verge and the EWI system
It is advisable to consult with experienced professionals or qualified contractors who specialise in both roofing and EWI installations. Their expertise will ensure that the extension of the roof verges is carried out correctly, considering the specific requirements of the roof type, finish and ventilation
By extending the roof verges appropriately, you can ensure the effective integration of the EWI system with the roof structure, regardless of the roof type, finish, or ventilation requirements. This enhances the overall performance, durability, and visual appeal of the property while maintaining proper roof functionality.
Addressing damp and moisture issues pre EWI installation
Damp Treatment is an important consideration before the installation of external wall insulation (EWI), especially if the existing walls have issues with dampness. Proper damp treatment measures are essential to ensure the long-term effectiveness and durability of the insulation system. Here are some common damp treatment procedures that may be required:
Addressing Moisture Ingress: One of the primary objectives of damp treatment is to identify and rectify any sources of moisture ingress. This can involve investigating the causes of dampness, such as leaks, rising damp, or condensation, and implementing appropriate solutions to prevent further moisture infiltration. It is important to address these issues before installing EWI to prevent dampness from affecting the insulation and to maintain a dry and healthy environment inside the property.
Repairing or Replacing Damaged Damp-Proof Courses: Damp-proof courses (DPCs) are barriers typically installed in walls to prevent moisture from rising through capillary action. If the existing DPC is damaged or ineffective, it may need to be repaired or replaced. This ensures proper moisture control and prevents dampness from compromising the effectiveness of the insulation. Repairing or replacing the DPC helps to maintain a barrier against moisture and protects the insulation material from potential water damage.
Applying Damp-Proof Coatings: Another damp treatment measure involves the application of damp-proof coatings to the internal or external surfaces of the walls. These coatings act as an additional barrier against moisture penetration, minimising the risk of dampness and protecting the insulation material. Waterproof membranes or liquid damp-proof courses can be applied to create a seal that prevents moisture from entering the walls. Applying damp-proof coatings is an effective way to enhance moisture resistance and ensure the long-term performance of the EWI system.
By addressing dampness through these treatment measures, the EWI installation can be carried out on a sound and moisture-controlled substrate. This helps to ensure the long-term effectiveness of the insulation system, minimise the risk of damage, and create a comfortable and healthy living environment for the occupants. Consulting with damp treatment specialists or experienced contractors is crucial to accurately assess the damp issues and determine the most suitable treatment methods for your specific situation.
Presence of pest issues
Pest Control is an important consideration before the installation of external wall insulation (EWI) to ensure that any existing pest infestations are addressed and potential pest entry points are sealed off. Here are some common pest control measures that may be required:
Identifying Pest Infestations: It is crucial to identify any existing pest infestations on the external walls before installing EWI. This can include pests such as rodents, insects, or birds. By conducting a thorough inspection, pest control professionals can determine the type and extent of the infestation, allowing them to implement the appropriate treatment methods
Implementing Pest Control Measures: Once pest infestations are identified, pest control measures can be implemented. This may involve the use of traps, baits, or insecticides to eliminate pests effectively. In the case of bee infestations, it is important to involve professional beekeepers or pest control specialists who can safely relocate the beehives without causing harm to the bees.
Sealing Potential Pest Entry Points: It is essential to identify and seal off any potential entry points on the external walls that pests may use to access the property. This includes gaps, cracks, or openings where pests can enter. By sealing these entry points with appropriate materials, such as sealants or mesh, the risk of future pest infestations can be significantly reduced.
Considering Beehives: In the case of beehives, it is important to approach their removal or relocation with care and consideration for the bees. Beehives play a crucial role in pollination and ecosystem balance. Instead of removing beehives, it is advisable to consult professional beekeepers or apiarists who can safely relocate the beehives to a suitable location while ensuring the safety of both the bees and the residents.
Japanese Knotweed and Impact on EWI installation
Presence of Japanese Knotweed is another important consideration before the installation of external wall insulation (EWI). Japanese Knotweed is an invasive plant species that can cause significant damage to buildings and structures. Here are some key points to consider regarding Japanese Knotweed:
Identification: Japanese Knotweed has distinct features such as bamboo-like stems, heart-shaped leaves, and clusters of small white flowers. It grows rapidly and can reach heights of up to 3 meters. If you suspect the presence of Japanese Knotweed on your property, it is important to consult with a qualified specialist for accurate identification.
Impact on EWI: Japanese Knotweed can pose a threat to the integrity of the building and the effectiveness of EWI if it is in close proximity to the external walls. The plant’s rhizomes (underground stems) can spread extensively, potentially causing damage to foundations, drains, and other structures. It is essential to address the presence of Japanese Knotweed before installing EWI to prevent any future issues.
Treatment and Removal: Japanese Knotweed is notoriously difficult to eradicate due to its resilient rhizomes. It is recommended to seek professional assistance for the treatment and removal of Japanese Knotweed. Qualified specialists can employ effective methods such as herbicide application, excavation or stem injection to control and eradicate the plant
Legal Considerations: The presence of Japanese Knotweed is subject to legal regulations in many countries, including the UK. It is essential to comply with local legislation and guidelines when dealing with Japanese Knotweed. Failure to properly manage and disclose the presence of Japanese Knotweed can have legal implications when selling or purchasing a property
Professional Consultation: It is highly recommended to consult with a specialist in Japanese Knotweed management to assess the extent of the infestation and determine the appropriate course of action. These professionals can provide advice on treatment options, mitigation measures, and any legal obligations that need to be addressed.